WireGuard is a modern VPN. Arguably the best in many crucial aspects like security, and simplicity, at the moment of writing this.
So here's how to setup WireGuard on Ubuntu 20.04, and also, how to setup the corresponding WireGuard client on a Windows 10 machine.
Concepts
Keys
We'll use Keys (key pairs): Public and Private keys.
IP addresses
We'll see IP Addresses: Those of the VPN server, the computer where it's
installed, and the DNS server used by the client. We'll use 35.174.118.17 in
this tutorial, but please get the one that your server is using. To find it,
simply do an ifconfig on your server, and look for inet, in the output.
Ports
We'll use a port, which is a kind of door to enter into a system. That door
can either be open, or with a firewall, it can be "closed". We'll use the port 61951 throughout this tutorial, but it could be something else like 51820, or 54321. As long as it isn't used by another service on the server.
(network) Interfaces
A network interface is just a short name for a network entry, for a computer to communicate in a network.
Interfaces have names that look like eth0, wlan, and such. You
can see what I mean by doing an ifconfig on a Linux or macOS shell. It's the first part before the column :. For example:
ens3: flags=4163<UP,BROADCAST,RUNNING,MULTICAST>  mtu 1500
        inet 35.174.118.17  netmask 255.255.254.0  broadcast 35.174.118.255
        inet6 2001:19f0:4:2360:5402:3ff:fe0f:c619  prefixlen 64  scopeid 0x0<global>
        inet6 fe90::5402:3ff:fe0f:c619  prefixlen 64  scopeid 0x20<link>
        ether 56:00:03:0f:b6:19  txqueuelen 1000  (Ethernet)
        RX packets 1070983  bytes 786173353 (786.1 MB)
        RX errors 0  dropped 0  overruns 0  frame 0
        TX packets 1053635  bytes 803986773 (803.9 MB)
        TX errors 0  dropped 0 overruns 0  carrier 0  collisions 0
See that ens3? that's an interface name.
On windows, ipconfig is the equivalent command, but it's not showing that interface name. But it doesn't matter for
us, as it is only the network interface of the server that we'll need.
On the (ubuntu) server
Pre-requisites for the server
- Ubuntu (20.04, which is an LTS) installed on that machine
- Root access to that machine
Before we do anything
Take note of your current IP address, by going at whatismyip.com in your browser.
Installation steps
sudo apt update
sudo apt install wireguard
Then, we configure the firewall (ufw) to allow traffic to go through the
port 61951:
sudo ufw allow 61951/udp
The udp part is just another way of transmitting packets. Normally we use
tcp, but in the case of VPNs, we usually want faster transfer, so in this
case we use UDP.
Configuration
Note on the text Editor
You'll need to edit the
/etc/sysctl.conffile, so you will needsudoand a text editor likenanoorvim. If you don't knowvim, I suggestnano. In this tutorial I will usenano.
sudo nano /etc/sysctl.conf
and then, remove the comment mark (#) before the net.ipv4.ip_forward=1
line.
Save the file, and exit the editor.
To apply the changes, do:
sudo sysctl -p
Now, we'll generate the keys for the server:
wg genkey | sudo tee /etc/wireguard/server_private.key | wg pubkey | sudo tee /etc/wireguard/server_public.key
Now, if you (sudo) ls inside /etc/wireguard, you should see those 2 files
created.
And since the private key is, well... private, let's secure it with this
command:
sudo chmod 600 /etc/wireguard/server_private.key
To see the keys you just generated, do:
sudo cat /etc/wireguard/server_private.key
cat /etc/wireguard/server_public.key
Now, we'll create a file for wireguard configuration:
sudo nano /etc/wireguard/wg0.conf
And put that, for now (more to come later):
[Interface]
PrivateKey = oCH7Z0g+ieQ99KkkR1E5EO22Evs5q75F+ES4O4Oc93E= # The server_private.key value.
Address = 10.5.5.3/24 # Internal IP address of the VPN server.
ListenPort = 61951 # Previously, we opened this port to listen for incoming connections in the firewall (ufw)
# Change "ens3" to the name of your network interface in the following two settings. This commands configures iptables for WireGuard.
PostUp = iptables -A FORWARD -i wg0 -j ACCEPT; iptables -t nat -A POSTROUTING -o ens3 -j MASQUERADE
PostDown = iptables -D FORWARD -i wg0 -j ACCEPT; iptables -t nat -D POSTROUTING -o ens3 -j MASQUERADE
You will need to change those values:
- PrivateKey value (
oCH7Z0g[...]) to the one you'll find inserver_private.key. - The Address value, which you can find in the private network settings of your
server dashboard. For example, on vultr, it would be in your instance's
Settings tab, under the Private Network section. It's an address that
look like this:
10.5.5.3. You'll also add/24at the end of it. - The ListenPort value (
61951) is the same we talked about at the beginning. It's the port through which the VPN server will communicate with your client. - In PostUp, and PostDown, you'll see
ens3. Change that to the interface that you get when you doip -o -4 route show to default | awk '{print $5}'on your server. For example, it could beens3, so change that as needed.
You can now save and exit this file. And set the permissions on that file more tightly:
sudo chmod 600 /etc/wireguard/wg0.conf
And now, do this to start WireGuard VPN:
sudo systemctl start wg-quick@wg0
And run this almost identical command, to make the VPN server always start after a reboot of your server:
sudo systemctl enable wg-quick@wg0
the wg0 interface
Now, bring up the wg0 interface with this command:
sudo wg-quick up wg0
So now, if you issue ifconfig, you will see wg0 among the interfaces. Something like this:
wg0: flags=209<UP,POINTOPOINT,RUNNING,NOARP>  mtu 1420
        inet 10.1.96.0  netmask 255.255.240.0  destination 10.1.96.0
        unspec 00-00-00-00-00-00-00-00-00-00-00-00-00-00-00-00  txqueuelen 1000  (UNSPEC)
        RX packets 443061  bytes 88601148 (88.6 MB)
        RX errors 0  dropped 16144  overruns 0  frame 0
        TX packets 671392  bytes 739971080 (739.9 MB)
        TX errors 0  dropped 233 overruns 0  carrier 0  collisions 0
Note that it is no longer 10.5.5.3 but it has inet 10.1.96.0. It's normal.
It also changed the wg0.conf to reflect that.
If you want to disable that interface, simply do down instead.
But if you want to change the configuration, you can do this after the change:
sudo systemctl restart wg-quick@wg0
On the client side (Windows)
- Download the installer from https://www.wireguard.com/install/
- Execute the
.msifile that you'll get. And now you should see a WireGuard logo in your system tray.
Configuration
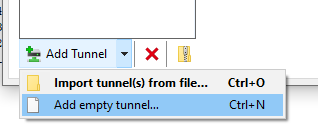
In the WireGuard Windows UI, go to the bottom Add Tunnel button, and select
Add Empty Tunnel:
Next, you'll see this window, but with a different value for the Private Key:

This is your base configuration. You'll need to add a few lines here:
Address, and DNS. Like this:
[Interface]
PrivateKey = OCJx8Im1MyHvNRsrBR7bWWWmYUbDOQ5W/YQg2vA6KWA=
Address = 192.168.50.223/24 # IP address of the client's wg0 interface.
DNS = 1.1.1.1
The Address field is the IP that the VPN client's network interface will occupy. It must not be already in use. A good candidate for this IP can be the value of your main network interface
(found in ipconfig in your windows terminal), and you add 1 to the last
digit, just to make it different (i.e. not used). For example, I have this for my wifi
interface I'm using on my windows machine:
Wireless LAN adapter Wi-Fi:

   Connection-specific DNS Suffix  . :
   Link-local IPv6 Address . . . . . : fe80::ac40:f1f7:e086:9257%10
   IPv4 Address. . . . . . . . . . . : 192.168.50.222
   Subnet Mask . . . . . . . . . . . : 255.255.255.0
   Default Gateway . . . . . . . . . : 192.168.50.1
So I took 192.168.50.223 (added 1 to 222), so the Address I will put on my
configuration will be 192.168.50.223/24.
The DNS can be a public DNS IP that you can use for free. I suggest you take
something like 1.1.1.1 (graciously offered by Cloudflare) or 9.9.9.9
(graciously offered by Quad9.
Now, after the [Interface] block, add another. The [Peer] configuration
block:
[Peer]
PublicKey = uZik78EWgYCLQRMdG6k6QK0mzHFqfr4uhOEjPyXe5WE=
AllowedIPs = 0.0.0.0/0
Endpoint = 35.174.118.17:61951
PublicKey is what you can find on your server, in /etc/wireguard/server_public.key.
AllowedIPs can stay 0.0.0.0/0.
Endpoint is the public IP of your server, followed by the port number.
Recap of the client config file
Your client config on windows should now look like this:
[Interface]
PrivateKey = OCJx8Im1MyHvNRsrBR7bWWWmYUbDOQ5W/YQg2vA6KWA=
Address = 192.168.50.223/24 # IP address of the client's wg0 interface.
DNS = 1.1.1.1

[Peer]
PublicKey = uZik78EWgYCLQRMdG6k6QK0mzHFqfr4uhOEjPyXe5WE=
AllowedIPs = 0.0.0.0/0
Endpoint = 35.174.118.17:61951
Now make sure you give it an appropriate name so you remember what is this WireGuard instance (you can have many), and click Save. You should now see the new Tunnel's name in Tunnels tab.
Click Activate, and if you see a green shield icon with Active, next to the Status line, it means it worked. Now try to browse the web in your browser. If it doesn't work, try rebooting your machine, or reviewing the previous steps.
You can now go to whatismyip.com and you should see the VPN server's IP address instead of your own. Hurray!
Go back to the server
Once you're done with the client configuration, go back to the server
configuration, and add a [Peer] block, after the [Interface] block, in /etc/wireguard/wg0.conf, so that it looks like this:
[Interface]
PrivateKey = oCH7Z0g+ieQ99KkkR1E5EO22Evs5q75F+ES4O4Oc93E= # The server_private.key value.
Address = 10.5.5.3/24 # Internal IP address of the VPN server.
ListenPort = 61951 # Previously, we opened this port to listen for incoming connections in the firewall (ufw)
# Change "ens3" to the name of your network interface in the following two settings. This commands configures iptables for WireGuard.
PostUp = iptables -A FORWARD -i wg0 -j ACCEPT; iptables -t nat -A POSTROUTING -o ens3 -j MASQUERADE
PostDown = iptables -D FORWARD -i wg0 -j ACCEPT; iptables -t nat -D POSTROUTING -o ens3 -j MASQUERADE

[Peer]
PublicKey = AXZBCUqrlAGnt2jddHNu6ECQ0yp8mbQxPzefP6j8VCo=
AllowedIPs = 192.168.50.223/32
In this new [Peer] configuration block, we have this:
PublicKey, which is the Public key that was generated on your windows machine at the same time that you created your "Tunnel".
AllowedIPs is the IP of the interface that will be created by WireGuard on your local machine (the client). See above.
Endpoint is the real public IP address of your computer when it's connected to the web.
Now restart the server:
sudo systemctl restart wg-quick@wg0
And if you go to whatismyip.com in your browser, you should see your server's IP address. If so, it worked.
Otherwise, feel free to send me an email or a question on twitter.
Acknowledgements
I copy/pasted a lot of steps from that article from serverspace.us, for the server configuration steps, so here's some back-link for their SEO juice. ;-)
I also used that article for the Windows (client) configuration part.
Special thanks to Pascal Meunier, founder of Hivetek who told me about WireGuard, and who was kind enough to answer my questions on the subject.
